在Kubernetes中使用Bitfusion
目前的GPU虚拟化解决方案存在一些不足:
- GPU计算力未得到充分利用
- 无法较好的隔离GPU资源或无法动态的调整资源隔离粒度
- 只能使用本地的GPU资源
- 应用程序调度困难
Bitfusion通过提供一个远程GPU池来解决以上这些问题。 Bitfusion将GPU作为一等公民,使得GPU可以像计算资源一样被抽象、分区、自动化和共享。另一方面,Kubernetes已经成为事实上的部署和管理机器学习工作负载的平台。
然而,Kubernetes没有提供一种原生方式来使用Bitfusion的远程GPU池。这一限制成为Kubernetes上的作业使用Bitfusion GPU的关键挑战。Kubernetes需要一种友好的方式来使用Bitfusion GPU资源:
- 支持资源管理
- 支持GPU池管理
本项目通过允许Kubernetes使用Bitfusion的方式来解决这些问题
1.架构
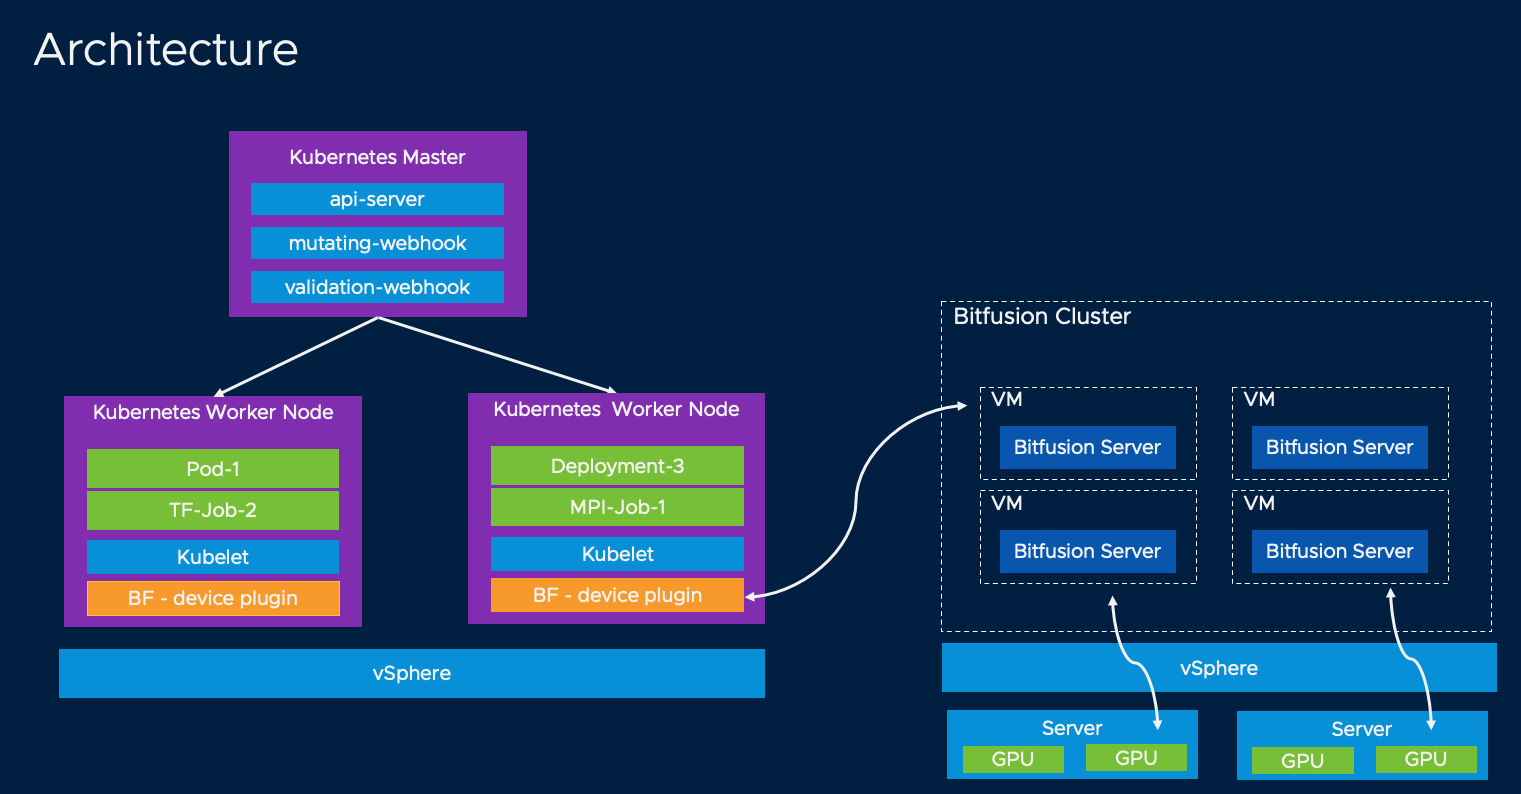
我们通过以下两个组件来实现允许Kubernetes使用Bitfusion的目的。
- 1.bitfusion-device-plugin
- 2.bitfusion-webhook
组件1和组件2分别内置在独立的Docker 镜像中。 bitfusion-device-plugin 作为DaemonSet 运行在kubelet所在的每个工作节点上。 bitfusion-webhook 作为Deployment 运行在Kubernetes主节点上。
2.前置条件
- 安装机器的操作系统为Ubuntu Linux
- OpenSSL需要安装在Ubuntu上
- Kubernetes 1.17+
- Bitfusion 2.5+
- kubectl和docker命令可以正常使用
如果需要启用配额功能,需要更新以下的yaml文件。
- 修改bitfusion-injector.yaml文件。
vim bitfusion-with-kubernetes-integration/bitfusion_device_plugin/webhook/deployment/bitfusion-injector.yaml
- 为TOTAL_GPU_MEMORY设置合适的值,TOTAL_GPU_MEMORY代表Bitfusion Server所管理的GPU物理设备的显存大小,单位是MB。
apiVersion: apps/v1
...
          env:
            - name: TOTAL_GPU_MEMORY
              value: 16000
...
2.1 获取Bitfusion的token文件
为了启用Bitfusion,用户必须生成一个用于授权的Bitfusion Token,并将相关的tar文件下载到安装机器上。
按照以下步骤从vCenter获取Token:
Step 1. 登录 vCenter
Step 2. 在插件部分点击Bitfusion

Step 3. 选择Tokens 标签,然后选择要下载的适当的token

Step 4. 点击 DOWNLOAD 按钮, 在此之前需要确保token是可用的

如果列表中没有可用的token, 需要点击 NEW TOKEN 来创建Token. 更多详情,请参阅: https://docs.vmware.com/en/VMware-vSphere-Bitfusion/2.5/Install-Guide/GUID-361A9C59-BB22-4BF0-9B05-8E80DE70BE5B.html
2.2 使用Bitfusion Baremetal token创建Kubernetes secret
将Bitfusion Baremetal Token文件上传到安装机器。使用以下命令解压缩文件:
$ mkdir tokens
$ tar -xvf ./2BgkZdN.tar -C tokens
现在我们得到了三个文件在目录 tokens/ 中,分别是: ca.crt, client.yaml 和 services.conf :
tokens
├── ca.crt
├── client.yaml
└── servers.conf
然后使用以下命令在Kubernetes中的kube-system 命名空间中创建一个secret :
$ kubectl create secret generic bitfusion-secret --from-file=tokens -n kube-system
更多关于kubectl 信息,请参阅: https://kubernetes.io/docs/reference/kubectl/overview/
3.快速开始
这里有两种部署的方式,可以选择其中任意一种:
- 使用已经构建好的容器镜像部署
- 使用代码构建容器镜像,并用生成的镜像部署
3.1 部署方式1: 使用已经构建好的容器镜像部署 (推荐)
使用以下命令克隆源代码:
$ git clone https://github.com/vmware/bitfusion-with-kubernetes-integration.git
使用以下命令部署Bitfusion device plugin和其他相关组件,需要确保Kubernetes集群可以连接到Internet。
$ cd bitfusion-with-kubernetes-integration-main/bitfusion_device_plugin
$ make deploy
3.2 部署方式2: 使用代码构建容器镜像,并用生成的镜像部署
用户可以选择从源代码构建容器镜像 ,而不是使用预先构建的容器镜像。在镜像构建完成后,它们也可以被推送到镜像仓库 (Docker Hub或本地的镜像仓库)。
使用以下命令克隆源代码:
$ git clone https://github.com/vmware/bitfusion-with-kubernetes-integration.git
在开始构建过程之前,需要修改Makefile中一些变量的值:
$ cd bitfusion-with-kubernetes-integration-main/bitfusion_device_plugin
$ vim Makefile
大多数变量的值不需要更改。如果要将镜像推送到镜像仓库,请确保IMAGE_REPO变量的值被设置为所选择的正确镜像仓库地址 (它的默认值是 docker.io/bitfusiondeviceplugin ):
# Variables below are the configuration of Docker images and repo for this project.
# Update these variable values with your own configuration if necessary.

IMAGE_REPO ?= docker.io/bitfusiondeviceplugin
DEVICE_IMAGE_NAME ?= bitfusion-device-plugin
WEBHOOK_IMAGE_NAME ?= bitfusion-webhook
PKG_IMAGE_NAME ?= bitfusion-client
IMAGE_TAG  ?= 0.1
现在可以使用下面的命令构建容器镜像了:
$ make build-image
可以用下面的命令检查容器镜像的构建结果:
$ docker images
REPOSITORY                                                                         TAG
docker.io/bitfusiondeviceplugin/bitfusion-device-plugin                            0.1
docker.io/bitfusiondeviceplugin/bitfusion-webhook                                  0.1
docker.io/bitfusiondeviceplugin/bitfusion-client                                   0.1
(推荐使用的可选项)如果需要将容器镜像推送到容器仓库,请使用以下命令推送它们。如果需要,可以使用“docker login”命令登录镜像仓库。(如何使用docker login?)
$ make push-image
注意: 如果没有可用的镜像仓库,可以将容器镜像导出到文件,然后拷贝到Kubernetes集群的每个工作节点。使用docker命令将容器镜像文件保存为tar文件,并手动分发到Kubernetes节点。然后从每个节点上的tar文件加载容器镜像,详见docker命令文档 。
使用以下命令部署Bitfusion device plugin和其他相关组件:
$ make deploy
3.3 部署的环境的验证
通过"部署方式1"或"部署方式2"完成安装后,使用以下命令查看命名空间"bwki"中是否正确启动了所有组件:
检查 device plugin 是否正在运行:
$ kubectl get pods -n kube-system

NAME                            READY   STATUS    RESTARTS   AGE
bitfusion-device-plugin-cfr87   1/1     Running   0          6m13s
检查webhook 是否正在运行:
$ kubectl  get pod -n bwki

NAME                                            READY   STATUS    RESTARTS   AGE
bitfusion-webhook-deployment-6dbc6df664-td6t7   1/1     Running   0          7m49s
检查其他部署的组件状态
$ kubectl get configmap -n bwki

NAME                                DATA   AGE
bwki-webhook-configmap              1      71m
$ kubectl get serviceaccount  -n bwki

NAME                           SECRETS   AGE
bitfusion-webhook-deployment   1         72m
$ kubectl get ValidatingWebhookConfiguration  -n bwki

NAME                          CREATED AT
validation.bitfusion.io-cfg   2021-03-25T05:29:17Z
$ kubectl get MutatingWebhookConfiguration   -n bwki

NAME                          CREATED AT
bwki-webhook-cfg              2021-03-25T05:29:17Z
$ kubectl get svc   -n bwki

NAME                          TYPE        CLUSTER-IP    EXTERNAL-IP   PORT(S)   AGE
bwki-webhook-svc              ClusterIP   10.101.39.4   <none>        443/TCP   76m
4. 在Kubernetes中使用Bitfusion资源创建任务
完成安装后,用户可以编写Kubernetes的YAML文件来使用Bitfusion资源。在YAML文件中有以下几个与Bitfusion资源相关的参数:
| 关键字 | 值 | 描述 |
|---|---|---|
| auto-management/bitfusion | all / none / injection | [all] 自动配置Bitfusion client(Bitfusion client安装,Bitfusion token导入进容器),自动改写容器的运行命令,加入bitfusion run的前缀及相应参数[injection] 仅为该容器自动配置Bitfusion client,不改写容器的运行命令[none] Bitfusion device plugin对该容器不做任何动作 |
| bitfusion.io/gpu-amount | 正整数 | 从Bitfusion Server集群所请求的GPU卡的个数 |
| bitfusion.io/gpu-percent | 正整数 | 从Bitfusion Server集群所请求的每一张GPU卡的显存百分比 |
| bitfusion.io/gpu-memory | 正整数 | 所请求的每一张GPU卡的显存数,默认单位是bit. 也可以指定其他Kubernetes的单位(Mi,M,G,Gi) |
| bitfusion-client/os | ubuntu18 / ubuntu20 / centos7 / centos8 | 用来指定Bitfusion client所在容器guest OS的版本 |
| bitfusion-client/version | 250 | Bitfusion client的版本,250代表Bitfusion client 2.5.0。目前镜像仅支持2.5.0,后续会陆续更新。 |
4.1. 方式 1:通过 gpu-percent 参数指定Bitfusion资源
编辑任务的YAML文件example/pod.yaml
apiVersion: v1
kind: Pod
metadata:
  annotations:
    auto-management/bitfusion: "all"
    bitfusion-client/os: "ubuntu18"
    bitfusion-client/version: "250"
  name: bf-pkgs
  # You can specify any namespace
  namespace: tensorflow-benchmark
spec:
  containers:
    - image: nvcr.io/nvidia/tensorflow:19.07-py3
      imagePullPolicy: IfNotPresent
      name: bf-pkgs
      command: ["python /benchmark/scripts/tf_cnn_benchmarks/tf_cnn_benchmarks.py --local_parameter_device=gpu --batch_size=32 --model=inception3"]
      resources:
        limits:
          # Request one GPU for this Pod from the Bitfusion cluster
          bitfusion.io/gpu-amount: 1
          # 50 percent of each GPU to be consumed
          bitfusion.io/gpu-percent: 50
      volumeMounts:
        - name: code
          mountPath: /benchmark
    volumes:
        - name: code
          # The Benchmarks used for the test came from: https://github.com/tensorflow/benchmarks/tree/tf_benchmark_stage
          # Please make sure you have the corresponding content in /home/benchmarks directory on your node
          hostPath:
            path: /home/benchmarks
运行以下命令提交任务:
$ kubectl create namespace tensorflow-benchmark
$ kubectl create -f example/pod.yaml
4.2 方式 2:通过 gpu-memory 参数指定Bitfusion资源
编辑任务的YAML文件example/pod-memory.yaml
apiVersion: v1
kind: Pod
metadata:
  annotations:
    auto-management/bitfusion: "all"
    bitfusion-client/os: "ubuntu18"
    bitfusion-client/version: "250"
  name: bf-pkgs
  # You can specify any namespace
  namespace: tensorflow-benchmark
spec:
  containers:
    - image: nvcr.io/nvidia/tensorflow:19.07-py3
      imagePullPolicy: IfNotPresent
      name: bf-pkgs
      command: ["python /benchmark/scripts/tf_cnn_benchmarks/tf_cnn_benchmarks.py --local_parameter_device=gpu --batch_size=32 --model=inception3"]
      resources:
        limits:
          bitfusion.io/gpu-amount: 1
          bitfusion.io/gpu-memory: 8000M
      volumeMounts:
        - name: code
          mountPath: /benchmark
    volumes:
        - name: code
          # The Benchmarks used for the test came from: https://github.com/tensorflow/benchmarks/tree/tf_benchmark_stage
          # Please make sure you have the corresponding content in /home/benchmarks directory on your node
          hostPath:
            path: /home/benchmarks
运行以下命令提交任务:
$ kubectl create namespace tensorflow-benchmark
$ kubectl create -f example/pod-memory.yaml
如果任务成功运行,会得到以下日志输出:
[INFO] 2021-03-27T04:26:40Z Query server 192.168.1.100:56001 gpu availability
[INFO] 2021-03-27T04:26:41Z Choosing GPUs from server list [192.168.1.100:56001]
[INFO] 2021-03-27T04:26:41Z Requesting GPUs [0] with 8080 MiB of memory from server 0, with version 2.5.0-fd3e4839...
Requested resources:
Server List: 192.168.1.100:56001
Client idle timeout: 0 min
[INFO] 2021-03-27T04:26:42Z Locked 1 GPUs with partial memory 0.5, configuration saved to '/tmp/bitfusion125236687'
[INFO] 2021-03-27T04:26:42Z Running client command 'python /benchmark/scripts/tf_cnn_benchmarks/tf_cnn_benchmarks.py --local_parameter_device=gpu --batch_size=32 --model=inception3' on 1 GPUs, with the following servers:
[INFO] 2021-03-27T04:26:42Z 192.168.1.100 55001 ab4a56d5-8df4-4c93-891d-1c5814cf83f6 56001 2.5.0-fd3e4839

2021-03-27 04:26:43.511803: I tensorflow/stream_executor/platform/default/dso_loader.cc:42] Successfully opened dynamic library libcudart.so.10.1

......

Instructions for updating:
non-resource variables are not supported in the long term
2021-03-27 04:26:48.173243: I tensorflow/core/platform/profile_utils/cpu_utils.cc:94] CPU Frequency: 2394455000 Hz
2021-03-27 04:26:48.174378: I tensorflow/compiler/xla/service/service.cc:168] XLA service 0x4c8ad60 executing computations on platform Host. Devices:
2021-03-27 04:26:48.174426: I tensorflow/compiler/xla/service/service.cc:175]   StreamExecutor device (0): <undefined>, <undefined>
2021-03-27 04:26:48.184024: I tensorflow/stream_executor/platform/default/dso_loader.cc:42] Successfully opened dynamic library libcuda.so.1
2021-03-27 04:26:54.831820: I tensorflow/stream_executor/cuda/cuda_gpu_executor.cc:1005] successful NUMA node read from SysFS had negative value (-1), but there must be at least one NUMA node, so returning NUMA node zero
2021-03-27 04:26:55.195722: I tensorflow/compiler/xla/service/service.cc:168] XLA service 0x4c927b0 executing computations on platform CUDA. Devices:
2021-03-27 04:26:55.195825: I tensorflow/compiler/xla/service/service.cc:175]   StreamExecutor device (0): Tesla V100-PCIE-16GB, Compute Capability 7.0
2021-03-27 04:26:56.476786: I tensorflow/stream_executor/cuda/cuda_gpu_executor.cc:1005] successful NUMA node read from SysFS had negative value (-1), but there must be at least one NUMA node, so returning NUMA node zero
2021-03-27 04:26:56.846965: I tensorflow/core/common_runtime/gpu/gpu_device.cc:1640] Found device 0 with properties:
name: Tesla V100-PCIE-16GB major: 7 minor: 0 memoryClockRate(GHz): 1.38
pciBusID: 0000:00:00.0
2021-03-27 04:26:56.847095: I tensorflow/stream_executor/platform/default/dso_loader.cc:42] Successfully opened dynamic library libcudart.so.10.1
2021-03-27 04:26:56.858148: I tensorflow/stream_executor/platform/default/dso_loader.cc:42] Successfully opened dynamic library libcublas.so.10
2021-03-27 04:26:56.870662: I tensorflow/stream_executor/platform/default/dso_loader.cc:42] Successfully opened dynamic library libcufft.so.10
2021-03-27 04:26:56.872082: I tensorflow/stream_executor/platform/default/dso_loader.cc:42] Successfully opened dynamic library libcurand.so.10
2021-03-27 04:26:56.884804: I tensorflow/stream_executor/platform/default/dso_loader.cc:42] Successfully opened dynamic library libcusolver.so.10
2021-03-27 04:26:56.891062: I tensorflow/stream_executor/platform/default/dso_loader.cc:42] Successfully opened dynamic library libcusparse.so.10
2021-03-27 04:26:56.916430: I tensorflow/stream_executor/platform/default/dso_loader.cc:42] Successfully opened dynamic library libcudnn.so.7
2021-03-27 04:26:57.108177: I tensorflow/stream_executor/cuda/cuda_gpu_executor.cc:1005] successful NUMA node read from SysFS had negative value (-1), but there must be at least one NUMA node, so returning NUMA node zero
2021-03-27 04:26:57.699172: I tensorflow/stream_executor/cuda/cuda_gpu_executor.cc:1005] successful NUMA node read from SysFS had negative value (-1), but there must be at least one NUMA node, so returning NUMA node zero
2021-03-27 04:26:58.487127: I tensorflow/core/common_runtime/gpu/gpu_device.cc:1763] Adding visible gpu devices: 0
2021-03-27 04:26:58.487327: I tensorflow/stream_executor/platform/default/dso_loader.cc:42] Successfully opened dynamic library libcudart.so.10.1
2021-03-27 04:53:53.568256: I tensorflow/core/common_runtime/gpu/gpu_device.cc:1181] Device interconnect StreamExecutor with strength 1 edge matrix:
2021-03-27 04:53:53.568703: I tensorflow/core/common_runtime/gpu/gpu_device.cc:1187]      0
2021-03-27 04:53:53.569011: I tensorflow/core/common_runtime/gpu/gpu_device.cc:1200] 0:   N
2021-03-27 04:53:53.939681: I tensorflow/stream_executor/cuda/cuda_gpu_executor.cc:1005] successful NUMA node read from SysFS had negative value (-1), but there must be at least one NUMA node, so returning NUMA node zero
2021-03-27 04:53:54.482940: I tensorflow/stream_executor/cuda/cuda_gpu_executor.cc:1005] successful NUMA node read from SysFS had negative value (-1), but there must be at least one NUMA node, so returning NUMA node zero
2021-03-27 04:53:54.846537: I tensorflow/core/common_runtime/gpu/gpu_device.cc:1326] Created TensorFlow device (/job:localhost/replica:0/task:0/device:GPU:0 with 7010 MB memory) -> physical GPU (device: 0, name: Tesla V100-PCIE-16GB, pci bus id: 0000:00:00.0, compute capability: 7.0)

......

TensorFlow:  1.14
Model:       inception3
Dataset:     imagenet (synthetic)
Mode:        training
SingleSess:  False
Batch size:  32 global
             32 per device
Num batches: 100
Num epochs:  0.00
Devices:     ['/gpu:0']
NUMA bind:   False
Data format: NCHW
Optimizer:   sgd
Variables:   parameter_server
==========
Generating training model
Initializing graph
Running warm up
Done warm up
Step    Img/sec total_loss
1       images/sec: 199.4 +/- 0.0 (jitter = 0.0)        7.312
10      images/sec: 196.6 +/- 2.1 (jitter = 5.7)        7.290
20      images/sec: 198.3 +/- 1.3 (jitter = 4.5)        7.351
30      images/sec: 198.4 +/- 0.9 (jitter = 3.8)        7.300
40      images/sec: 199.4 +/- 0.8 (jitter = 4.1)        7.250
50      images/sec: 199.8 +/- 0.7 (jitter = 4.6)        7.283
60      images/sec: 200.1 +/- 0.6 (jitter = 4.2)        7.301
70      images/sec: 199.8 +/- 0.6 (jitter = 4.2)        7.266
80      images/sec: 200.1 +/- 0.6 (jitter = 4.4)        7.286
90      images/sec: 199.9 +/- 0.5 (jitter = 4.4)        7.334
100     images/sec: 199.9 +/- 0.5 (jitter = 4.0)        7.380
----------------------------------------------------------------
total images/sec: 199.65
----------------------------------------------------------------

......
4.3 auto-management/bitfusion的设置
当设置auto-management/bitfusion的值为all时, 经过webhook的处理之后,通过以下方式可以查看改写后的容器命令
$ kubectl edit pod -n tensorflow-benchmark bf-pkgs
apiVersion: v1
kind: Pod
metadata:
  annotations:
    # update annotations
    auto-management/status: injected
  name: bf-pkgs
  namespace: tensorflow-benchmark
spec:
  containers:
  # update command
  - command:
    - /bin/bash
    - -c
    - /bitfusion/bitfusion-client-ubuntu1804_2.5.1-13/usr/bin/bitfusion run -n 1 -p
      0.500000 python /benchmark/scripts/tf_cnn_benchmarks/tf_cnn_benchmarks.py --local_parameter_device=gpu
      --batch_size=32 --model=inception3
    env:
    # add LD_LIBRARY_PATH
    - name: LD_LIBRARY_PATH
      value: /bitfusion/bitfusion-client-ubuntu1804_2.5.1-13/opt/bitfusion/lib/x86_64-linux-gnu/lib/:/usr/local/nvidia/lib:/usr/local/nvidia/lib64
    image: nvcr.io/nvidia/tensorflow:19.07-py3
    imagePullPolicy: IfNotPresent
    name: bf-pkgs
    resources:
      limits:
        # update resource name
        bitfusion.io/gpu: "50"
      requests:
        bitfusion.io/gpu: "50"
    volumeMounts:
    - mountPath: /benchmark
      name: code
    # add some volume
    - mountPath: /etc/bitfusion
    .......
  # add initContainer
  initContainers:
  - command:
    - /bin/bash
    - -c
    - ' cp -ra /bitfusion/* /bitfusion-distro/ && cp /root/.bitfusion/client.yaml
      /client && cp -r /bitfusion/bitfusion-client-centos7-2.5.0-10/opt/bitfusion/*
      /workload-container-opt '
    image: docker.io/bitfusiondeviceplugin/bitfusion-client:0.1.1
    imagePullPolicy: IfNotPresent
    name: populate
    ......
发现容器的command中的命令被自动做了相应的改写。
5. 配额的设置和使用(可选)
5.1 设置配额
device plugin使用的资源bitfusion.io/gpu,使用以下命令来创建配额。requests.bitfusion.io/gpu: 100代表在指定的namespace下的作业,最多可以使用Bitfusion的一张GPU卡的100%的能力。
cat <<EOF | kubectl create -f -
apiVersion: v1
kind: List
items:
- apiVersion: v1
  kind: ResourceQuota
  metadata:
    name: bitfusion-quota
    namespace: tensorflow-benchmark
  spec:
    hard:
        requests.bitfusion.io/gpu: 100
EOF
分别通过指定bitfusion.io/gpu-memory参数和bitfusion.io/gpu-percent参数来创建任务。
5.2 指定bitfusion.io/gpu-memory参数创建pod:
使用以下命令创建pod
cat <<EOF | kubectl create -f -
apiVersion: v1
kind: Pod
metadata:
  annotations:
    auto-management/bitfusion: "all"
    bitfusion-client/os: "ubuntu18"
    bitfusion-client/version: "250"
  name: bf-pkgs
  namespace: tensorflow-benchmark
spec:
  containers:
    - image: nvcr.io/nvidia/tensorflow:19.07-py3
      imagePullPolicy: IfNotPresent
      name: bf-pkgs
      command: ["python /benchmark/scripts/tf_cnn_benchmarks/tf_cnn_benchmarks.py --local_parameter_device=gpu --batch_size=32 --model=inception3"]
      resources:
        limits:
          bitfusion.io/gpu-amount: 1
          bitfusion.io/gpu-memory: 8000M
      volumeMounts:
        - name: code
          mountPath: /benchmark
  volumes:
    - name: code
      hostPath:
        path: /home/benchmarks
EOF
由于TOTAL_GPU_MEMORY的值被设置为16000,代表Bitfusion集群中的GPU卡的显存是16GB。所以当这个pod请求1张GPU设备的8000M显存时,相当于申请了1张GPU卡的50%的算力,因此对于bitfusion.io/gpu资源的配额的占用是50。
配额占用的计算公式:bitfusion.io/gpu配额占用 = 申请的GPU显存大小 / TOTAL_GPU_MEMORY * 申请的GPU数量 * 100;结果会向上取整。
通过以下命令可以查看配额的占用情况。
$ kubectl describe quota -n tensorflow-benchmark bitfusion-quota

5.3 指定bitfusion.io/gpu-percent参数创建pod
使用以下命令创建pod
cat <<EOF | kubectl create -f -
apiVersion: v1
kind: Pod
metadata:
  annotations:
    auto-management/bitfusion: "all"
    bitfusion-client/os: "ubuntu18"
    bitfusion-client/version: "250"
  name: bf-pkgs
  namespace: tensorflow-benchmark
spec:
  containers:
    - image: nvcr.io/nvidia/tensorflow:19.07-py3
      imagePullPolicy: IfNotPresent
      name: bf-pkgs
      command: ["python /benchmark/scripts/tf_cnn_benchmarks/tf_cnn_benchmarks.py --local_parameter_device=gpu --batch_size=32 --model=inception3"]
      resources:
        limits:
          bitfusion.io/gpu-amount: 1
          bitfusion.io/gpu-percent: 50
      volumeMounts:
        - name: code
          mountPath: /benchmark
  volumes:
    - name: code
      hostPath:
        path: /home/benchmarks
EOF
配额占用的计算公式:bitfusion.io/gpu配额占用 = gpu占用百分比 * 申请的GPU数量 * 100;结果会向上取整。
通过以下命令可以查看配额的占用情况。
$ kubectl describe quota -n tensorflow-benchmark bitfusion-quota
6.Troubleshooting
如果pod 没有成功运行,使用下面的命令检查日志中的详细信息
$ kubectl logs -n tensorflow-benchmark bf-pkgs
“tensorflow-benchmark”是pod的命名空间。“bf-pkgs”是pod的名称
下面的日志显示了一些连接Bitfusion server的错误

检查vCenter Bitfusion插件中Bitfusion token的有效性。重新下载一个新的token,并使用以下命令更新Kubernetes中的secret :(确保在Kubernetes的每个命名空间中删除所有旧的bitfusion-secret之后再新建secret)
$ kubectl delete secret -n kube-system bitfusion-secret
$ kubectl delete secret -n tensorflow-benchmark  bitfusion-secret
$ kubectl create secret generic bitfusion-secret --from-file=tokens -n kube-system
$ kubectl create secret generic bitfusion-secret --from-file=tokens -n kube-system
$ make deploy
7. 备注
-
Bitfusion device plugin会更新LD_LIBRARY_PATH这个环境变量的值,如果用户在构建docker镜像时指定了这个值,建议在使用这个镜像时,在yaml文件中通过以下方式来设置这个值。否则LD_LIBRARY_PATH的值可能会被覆盖。
-
如果要在TKGi(Tanzu Kubernetes Grid Integrated)上部署Bitfusion device plugin,需要安装CFSSL,同时需要修改bitfusion-with-kubernetes-integration-main/bitfusion_device_plugin/Makefile文件中的K8S_PLATFORM的值为tkgi。
K8S_PLATFORM ?= tkgi